 I feel like I have to preempt this post by saying that I think there is no other AT binding out there that out performs the Dynafit system when considering weight, ease of use, reliability and performance. Yeah, you can pretty much make any product do anything you want, but the trick is to keep it light, not too complex, durable, free of defects and not cost a fortune. Others try to one up Dynafit all the time quoting words like “freeride” and “high performance”, but those of us skiers that use Dynafits know the real story of their proven performance. Feel free to look at other bindings out there, but be sure to at least try some Dynafits, or talk to a veteran Dyanfit user before you make your final decision. Now, on to today’s post.
 Yeah…I’ve been called “anal” at times. Sometimes it’s worthy, mostly due to things I’ve learned over the years, but occasionally it is just due to my manic personality. Sometime I find myself being “anal” when it comes to my Dynafits. Now, you understand that in all production systems, there is some sort of balance between precision and cost-effectiveness. One can make a certain part so precisely, down to the smallest measurement, but it might cost him/her a million bucks to do so. I don’t know about you, but there is no way I’m paying a million bucks for some AT bindings. Hell, I’m rather telemark! Than again… 😉
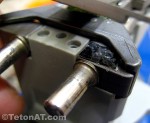
Over the years, I've found that occasionally one might get a pair of Dynafit bindings where the variances in production come together just right (wrong...really) and allow for a little extra vertical movement in the heel pins. I've never really seen any performance effects from this, it's just more of that "analness" in me that just doesn't like to feel any movement or slop in the system.
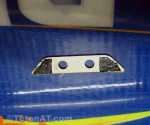
 Anyway, I figured out how to suck up some of the movement by using...yes...duct tape. A couple small pieces, placed on the bottom of the metal shim that sits between the top plate and the plastic that supports the pins or...a couple small pieces on top of the plastic that holds the pins in place. Use one or the other, or both...if each in itself is not enough. Remember when taking your heel pieces apart, back off on the DIN first and always use caution when putting the 4 little top screws back in place, as they are easy to strip and/or break. Happy moding!


Great tip Steve. Maybe you can help me with a similar problem – these bindings allow for a little extra vertical movement in the heels. I’ve never really seen any performance effects, but it might be worthwhile to see it if can be addressed:
http://i108.photobucket.com/albums/n33/badknots/100_1172.jpg
;^)
Damn Steve. Now I have to go check all my Dynafits. Nice catch.
only if you’re anal ted!!!
Hey Bob,
Only a big bag of herb prior to going out would keep you from seeing the performance effects of those bindings! Fix the heel, fix the problem!
Okay, just joking. Couldn’t resist. Don’t want an army of knee droppers at my door ready to flog me with those little patchouli-infused bags of crystals and shit they wear around their necks.
Ouch!
Take it easy brian, the guy in that photo looks like he is prepared to do some ass kikin
I know, it was foolish. Me and my lycra-clad ass are gittin’ outa dodge now!
“Strong, cheap, light. Pick two.” -Kieth Bontrager
Sounds about right Le Pistor!
Hey Steve has anyone ever tried adding a spacer to the lateral release spring. Either in between the spring and the bushing or between the spring and the plug. My old comforts are getting a little wimpy in the spring dept and I am wondering if I can’t breathe a little life into them. Thanks Dude
lucas…i’m sure someone has tried it…but i haven’t. have you called up dynafit to see if they would send you some new springs. if you are nice (ask for sarah) i bet they would send them to you for free. or even check your local BC shop…they often have extra springs laying around. maybe replace that bushing too…as they often see some wear after a bit.
Thanks again for the tip, Steve